Game Dev Part 2: Beginning Architecture
Now that we have the basic game play of our mobile game, as we discussed in part one of our game development series, we can begin to architect the game. We’ll start at a very high level and work our way down to the details. The way we do that is take the biggest chunks of the game and separate them out into their own classes that will perform specific tasks.
Overview
As we mentioned in our last installment, our game will be a turn-based combat system. I first thought about having the main character’s home be a sort of base to defend, in a tower defense-like sub-game with additional element such as exploring the surrounding area, along with our combat system. While some great ideas came out on paper, I could see it quickly got out of hand to begin to program that. However, I continued to create the “ultimate” game and didn’t let myself be too worried about the programming. After I had exhausted ideas and creativity (sometimes that happens pretty quickly), I pared down the offerings and got rid of the tower defense idea (maybe in the sequel) and the other fluff. If we had the budget and the manpower, we might accomplish that, but given the budget and the time constraint, we’ll make this simple and hopefully still fun. The exploring a map part came back to a game like The Adventures of Link or Final Fantasy, where the character walks around a 2D map encountering enemies. I’m ok with that and drawing inspiration from games that work is what started this whole thing. Our game won’t win any awards for originality but that’s ok too.
High Level View of Our Game Classes
So we have two main parts to our game: a part where the player explores the city and the combat system. As the foundation to our game, we have the following base on which to build our game:
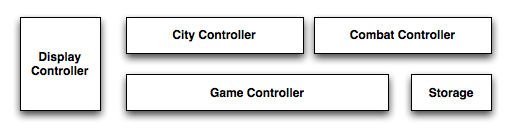
- A Game Controller, the main controller of it all. This class will controller the main aspects of the game such as starting the game, which screens to present, and handling other organizational tasks. This is a singleton class that we can access from any other class to interface with it’s public methods. This is different from a global class in a number of ways. We’ll go into this in more detail later.
- A Storage Controller will control loading and storing various aspects of the game. We’ll tell the Storage Controller to get us things and we’ll tell it to save things. We don’t really care how the Storage controller does these things, just that it does and does them well. Likely, it’ll be to a custom file that we write that’s stored on the mobile device’s memory but it could just as easily be to a database, a network or external storage. By abstracting this system, we can plug it into our future games.
- The Display Controller will handle things like displaying items to the screen and removing them. We can build in some utility functions like fading in and out views. We’ll go through the Display Controller whenever we want to display our items. That way, everything that has to be displayed will be in one place. If your familiar with Corona SDK, under the hood, this controller will manage our Display Groups, animations and other display properties and organize them into screens.
- The Combat Controller will handle our combat scenarios. This has to be stand alone so that during testing, we can simply pass in a bunch of inputs and begin our battle. The way this will work is, we’ll launch the app, and instead of going through the usual paths, we’ll construct the data (enemies, player stats, level, etc) and then pass that all into the combat controller, straight to the fight. Then we can test the combat system and tweaking inputs without having to go looking for a fight every time.
- The City Controller will allow us to place our player in a city to explore. Again, this will need to be stand alone so that we can use different inputs to put our player into different scenarios. We can also manually change the files that the Storage Controller uses to advance the player through the game without having to play through it every time.
Of course, we won’t build everything into these controllers as they would become huge and unmaintainable, let alone buggy, but those details will be built out later. This is a good start and will allow us to start work on the individual pieces.
Our player will be either be in combat or exploring the map. Other interactions, like scavenging (this is a post-apocalyptic game after all), interacting with items and people or reading some part of the storyline are all secondary screens that will be shown on top of the combat or map. Menus and other things will work in a similar manner. These are sometimes referred to as modal windows since they will go on top our main display and capture all the interactions. These modal windows will likely have their own controllers or be grouped into controllers that make sense. These will all be organized by the Display Controller, so we’ll always know what’s on the screen and we don’t have to figure out if some lonely class somewhere deep in our game, is displaying something we don’t know about.
As we’re still in the planning stage, we’ll hold off on starting the code just yet until we build out some more diagrams. However, we won’t build out a diagram for every single class we need as things will likely change and will be better changed in code. Think of this as outlining a school report. These are just the main things we want to talk about and we’ll include some of the sub-items, but we don’t include every detail. Soon, when we start the coding, we can look back and see the general blueprints of how we build everything out.